Showing posts with label FACEBOOK. Show all posts

4/23/2014

Why Facebook is Blue in Color?

When you open Facebook, the first thing that you notice is the blue color it uses. Ever wondered why is Facebook so blue in color and not changing its color scheme?

Ever since they started as 'thefacebook', Facebook has stayed with the blue color. Although major changes have been made in the Facebook theme since then, the major unchanged thing has been the blue color.


facebook blue color
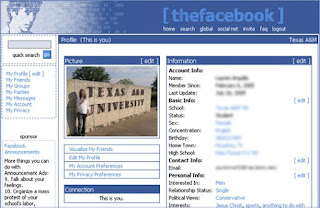
Facebook from its early days when it was known as  thefacebook

An exciting fact: In its earlier days, thefacebook.com required you to have an  .edu email id to join.

Everywhere from its login page to Facebook groups, you find only blue.

facebook is blue
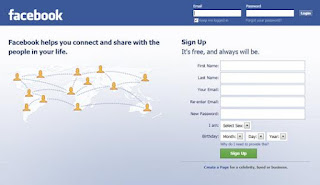
Facebook Login Page. All Blue!

The reason for this is that  Mark Zuckerberg, the young founder of Facebook is red-green color-blind and blue is the richest colour for him which he confirmed in an online interview with Leo Laporte.

Another important commercial factor for using blue color is the fact that most colors tend to distract the viewers. Blue on the other hand acts as a transparent background to the main content as visible to the human brain due to which most popular websites tend to use the blue color. It can easily be called a webmaster's favorite color. Blue color is also sometimes referred to as 'Nirvana' for the brain.

All these factors make blue a prominent color on Facebook.

Change Facebook Theme, Color & Appearance

Facebook is a social networking site which enables people to connect with friends and people around. That's how Facebook is usually introduced. However, Facebook is beyond the need of being introduced as almost everyone is on it. Despite its popularity, Facebook has one flaw; the default blue theme is really boring.

Some even consider it an annoyance while visiting Facebook. As Facebook does not allow users to change its theme like MySpace used to, users are left with no other option but to bear the theme Facebook wants them to use.

However, it is relatively easy to change the Facebook theme to a stylish one using an addon and custom themes which are available free of cost on the internet.

An example of the final outcome would be something like in the image.


Change Facebook Theme
This is the Ferrari theme. More themes are available for you to choose.


Requirement: The basic requirement for this to work is to have Mozilla Firefox or Google Chrome as your browser.

Steps to achieve this: . Mozilla Firefox users should carry out the following steps to successfully change Facebook theme.

  1. Open Mozilla Firefox and install 'Stylish' addon.
  2. Follow the basic steps to install the addon.
  3. Restart Firefox after successfully installing the Stylish addon.
  4. Login to your Facebook Account and click on the small 'S' button in your Firefox status bar.
  5. Click on "Find Styles for this Site" to open a new tab with free themes to use for Facebook.
  6. Click on any theme and a preview will be shown.
  7. If everything is fine in the previewed theme, click on "Install with Stylish" button at the top right corner of the page.
  8. A dialog box will open.
  9. Click on Install in the dialog box.

Steps for Google Chrome
  1. Install Stylish for Chrome from the Chrome Web Store.
  2. Navigate to Facebook.com and click on the S button.
  3. Click on "Find Styles for this Site" to open a new tab with free themes to use for Facebook.
  4. Click on any theme and a preview will be shown.
  5. If everything is fine in the previewed theme, click on "Install with Stylish" button at the top right corner of the page.

Stylish Button


facebook theme change

Install with stylish

Installing Ferrari theme for Stylish Firefox

Now whenever you open Facebook, it will show the theme that you have installed with Stylish instead of the boring old blue theme.

4/18/2014

How To Manage Your Multiple Facebook Account Easily

Facebook is the biggest social network in the world. And many of users create more than one account on Facebook. Sometimes it takes so much time to login one by one multiple account on Facebook. And if you want to login your another FB account and didn't want to log out your first account then you have to login in another browser. So here we are showing you How To Manage Your Multiple Facebook Account Easily.

All this now becomes very easy with the extension Google Chrome Quick Login Accounts for Facebook


This google chrome extension allows you to manage up to 5 Facebook account at the same time. It can enter the data access and change our profile for each account with a single click from the Facebook login screen. The extension is also safe, passwords are encrypted spam free and stored only on your computer.

Enjoy friends !!!
If you want to ask any question just drop your Precious comment below we would be happy to help you always. 

Trick To Free Facebook in Mobile 2014

Many of Facebook users don't know how to use free Facebook in mobile without the internet. it does not matter which mobile phone you have. This Latest Trick of 2014 works for all mobile phones.


Not a problem. You can still use your Facebook account by dialing *325# (or *fbk#) from your mobile phone – this service requires no data plan or Internet and it will even work on all phones.

How To Make Schedule Post In Facebook Pages

Facebook strongest feature is Facebook Pages where users get updates, entertainment and lots of fun with their friends. And admins of Facebook Pages makes post for their pages. But sometimes it's impossible to create post when they are offline. So Facebook has a magical option like Schedule Post for this situation. After scheduling any post it will be update which time you set when you scheduled it. So here we are going to tell you How To Make Schedule Post In Facebook Pages.
To Schedule a post go to option "Update Post" then write/upload you post their as you do.

After this just click on first option below to your post. In this option you can Schedule your post to any Date/time. After Set time just Click to Schedule.
Well done you Scheduled you Post Successfully. You can also edit your Schedule Post in your Activity Log of your Page. 
Thanks to Read Hope you Liked our Post.

How to Find Facebook Page/ID Code Using Facebook Graph 2014

How to Find Facebook Page/ID Code Using Facebook Graph 2014

Welcome back readers If you want to tag/mention your friend in comment from mobile then you have to find their ID Code and there are many ways to find Facebook Page/ID Code. Here we are showing you How to Find Facebook Page/ID Code Using Facebook Graph 2014.


Just go to this link - http://graph.facebook.com 


Now add you Page or Profile User name after above link

For Example my id :-

http://graph.facebook.com/knbrothers


   "id": "100004716430801",
   "first_name": "Knb",
   "gender": "male",
   "last_name": "Rothers",
   "link": "https://www.facebook.com/knbrothers",
   "locale": "en_US",
   "name": "Knb Rothers",
   "username": "knbrothers" 
 
So my account code is 100004716430801 

You can Find your Facebook Page or Profile Code by using this simple method.
 
Thank you, 

4/17/2014

How to Automatically Publish Your Blog to Facebook

How to Automatically Publish Your Blog to Facebook
Hi guys today i am tell you How to Automatically Publish Your Blog to Facebook
After Open the link click signup button and login with your facebook account 
Publish Your Blog to Facebook
new tab will appear click okay
Automatically Publish Your Blog to Facebook
 Enter the your blog name
Like i am enter the blog link
Automatically Publish Your Blog to Facebook
Enter your blog description taglines and click to the next button
Automatically Publish Your Blog to Facebook
Verify the email adress
Automatically Publish Your Blog to Facebook
your blog was succesfully added to the http://www.networkedblogs.com now your all post automatically post to the facebook 
Automatically Publish Your Blog to Facebook

How To Change Facebook Account/Profile Name After Name Limits Reached Latest 2014

Facebook is most popular networking site in the world in 2014. And many of users don't know that they can't change Facebook Account/Profile name after 5 times.  Facebook is Banning the Accounts who using those type of stylish fonts, fake names. Today we are Showing you How To Change Facebook Account/Profile Name After Name Limits Reached latets 2014. it's very simple and legal method.
As per facebook rules, the profile name you use should be your real name as it would be listed on your credit card, student ID, govt-issued proof etc. So I personally suggest everyone to keep your Facebook Account/Profile of real name without any stylish fonts or special characters.
So if your profile name limit is exceeded and want to change your Facebook profile name to your real name, then
First of all -  Click here


Fill that form and you have to upload your valid Government-issued Proof - photo ID like a Passport or Driver's license or any other Document etc and after your upload finishes,
Finally click on "Send" button.  Any 1 Proof will be enough in the list of below examples,

Green card, residence permit or immigration papers, Birth certificate Personal or vehicle insurance card Marriage certificate, Official name change paperwork, Voter ID card Non-driver's government ID.

You can submit your College ID card. Facebook staff will verify it and change your name within 4-5 days. So I suggest you to take a clear picture of you proof either by Scanning or by capturing from a good camera or mobile.

 If you have any doubts or problems regarding with this Facebook profile name change after name limits reached issue , You can ask here in comments. 

4/16/2014

Create Your Facebook Movie

Yes, there is a feature name "Look Back" on Facebook which convert your 2 year back Facebook activity into Short Movie Video. Only you have to Click on a Link and your Facebook movie will be ready automatically.

Here is the link :-   https://facebook.com/lookback/
https://blogger.googleusercontent.com/img/b/R29vZ2xl/AVvXsEhXoGjWLq3Vn8agSzMzFWidCX_rlisp3Lk3z2WOEmSBjLFNwotBLsF-hOn0STIs8qPV7FmzPYGwJECNJQQq3o4iLs3ar2XJiIAYrbFm2AKyOMRwWlsrLTSUhlM9-_8FsaRVUgb6ZwYmttK7/s1600/Capture.PNG

2/21/2014

Download Facebook Photos in Zip

thought of downloading all my Facebook photos by a single click and all the photos can be downloaded in zip format.
Or in your case, you must have thought to download all your crush’s photos in a single click, right or wrong?
In any case, you can download all photos of anyone in zip file by following method.
  1. Go to Facebook2zip online application and login with your Facebook account there.
  2. Now either choose your profile or type in your friend’s name to select his/her profile and click on Next button.
  3. Click on “Select all the albums” option at the bottom and click on Download button.
Download Facebook Photos in Zip
That’s it! Process will start that will take time depending on the number of pictures and albums. Once process is completed, all the photos will be downloaded in the zip format.

How to Remove Facebook Ads

To disable most of the annoying Facebook ads, follow these steps.
  1. Go to Account Settings.
  2. Now click on Ads from the left hand side bookmark menu.
  3. Click on “Edit” button at top right corner for “Third Party Sites” heading and then choose “No One” from the little menu. Do this with “Ads & Friends” also.
  4. Click Save Changes to change the settings for Facebook ads.
How to Remove Facebook Ads
That’s it! Now you’ve removed or disabled the Facebook ads on your profile.

2/10/2014

Facebook Offline Tricks


When you are busy or you don't want anyone to speak to or don't want to get disturbed, but you may want to see the friends who are online at that time while your chat is turned off. 
This simple app on Facebook will help you to this.
Check this app when your chat is turned off.
Type "Online Now"(inverted commas not included) in the search option.
See the trick for yourself.

Tips to Identify Fake Facebook Account Easily

Fake Facebook Accounts is Proving out to be a new Trend on Facebook. Probably 20-30% of total Facebook Accounts are fake or even more, This Number is Anticipated to be Increasing in Future. Fake accounts on Facebook are  mainly Created with an intention to Spam all over Facebook and Spread Virus. Many people Create Fake Girl’s Profiles to Dupe Some innocent Fb Users too.
Its Sad that Facebook Can’t Identify Fake Facebook Account and Delete them all Manully,and One Should not expect it from Facebook because of obvious Reasons. But yes they will Definately Block your account if you send lots of Friend requests to Unknown People and if you post or Comment Spammy Links over and over again. Facebook Catches you and then next time when you try to Login again, it asks you to Identify Photos of Friends, This is where Fake Account Users Get Caught.
But This Don’t Stop Spammers to Create another Fake Facebook account, So in this article we will Discuss Some Tips that will Help you to Identify Fake Facebook Account easily, So that you don’t fell in thier Traps, Report that Account to Facebook which will Help to Make Facebook Safer to all of us.


5 Tips to Identify Fake Facebook Account


1) Profile Picture :
  • First Thing we see about any Facebook account is thier Profile Picture, If you Find any Facebook Account on your Friendlist suspicious, First thing you will do is Use Reverse Image Search. This helps you find out if Similar Pictures are available on Internet.  First Download the Profile Picture of the account you find suspicious
  • Goto Google images Click on Camera icon which says Search by image, Click on Upload an Image, now choose the Picture you you had downloaded earlier , Now once the uploading Completes, google will show you Similar Images that already exist over internet.
2) Timeline:
  • The Facebook timeline of a Facebook accounts says a lot about that Profile. Most Fake Profiles have “Female” as a gender, this doesn’t Mean all fb accounts with “Female” Genders are Fake, There are many other things to Identify Fake Facebook Account.
  • if thier photos folder shows only 1 or 2 Pictures that too of random Celebrities then probably its fake.
  • if the Person does not update Status, or if he does, the Comments does not read like his Real friends or the profile does not comments on others status,then its likely to be a Fake profile
  • The “About” tab will Give you More information about the Profile, if the “About” tab don’t show you any info about the persons profile then thats an indication about fake profile
3) Wait for 1st january:
  • This is kind of Funny, Why Would one Wait for 1st jan to Identify Fake Facebook Account, Well Fake Profile Makers Most Probably Enter 1st jan as thier birth date while creating Fake account. So on 1st Jan, Facebook will Show you People who have birthdays today. Go through that list and Unfriend them if you dont know them Personally.
  • On 1st jan 2014, i was shocked to see 28 people Having thier birthday, Guess what i performed the above Proccess.
4) Girls Profile :
  • Most of the Fake profiles are created with Girl Identity and with a Beautiful face as a Profile Picture, You may even find Cell phone Number, Girls Hardly will Share thier Contact number in Public.
  • A girl Profile with Lots of Friends and Followers indicates a Fake Profile.
These were some tips to Identify Fake Facebook Account , which i wanted to share with you all, if you find any Fake profile then you and your friends can report it to facebook.

2/03/2014

Spoofing Cookies to Hack Facebook

Welcome back, my friends !!! Today we’ll be hacking Facebook profiles on your local network. You may think, “How is this useful ?? , nobody but me is using my network.! ” Well, you can use this on other Wi-Fi networks that are available for free (open Wi-fi) and crack their precious Facebook profile!! it sounds good is in it ??

note: This only works if your target is actually browsing through Facebook over http (not https) at the time you’re doing the hack.

How ??
We are going to use a well known method called “The cookie injection method.” This might be far off from becoming “elite,” but you need to get familiar with your Linux distribution first.

Step 1 : Get the right “stuff” 

For this hack, you’ll need a few things. Nothing special, but you’ll need this stuff. My best suggestion is that you first install BackTrack, Kali Linux, or Bugtraq because they have almost everything we need.
For this little trick, we’ll need:
  • A working Linux distribution (preferably Kali, Backtrack or Bugtraq)
  • Wireshark (a packet sniffer)
  • Firefox (web browser)
  • Nmap (scanner)
  • Greasemonkey (addon for Firefox)
  • Cookie injector (script for Greasemonkey)*

Step 2 : Network scan

First, to actually connect to a target, we’ll need an IP address. In order to get that, you’ll need to do a network scan with Nmap. So go ahead and boot up your terminal and enter the following command: 

  • nmap -F 192.168.xx.xx/24
Note: If this doesn’t work, use 10.0.x.x/24 instead.
This command will scan your network for any IP addresses connected to it. The -F gives the console the instruction to use “Fast mode.” If done correctly, you should see something like this:
That’s how your Nmap scan should look like.

Step 3 : Starting the Man-In-Middle Attrck

Now we’re going to start a man-in-the-middle attack, MITM for short.
An MITM attack is an attack were we spoof our MAC address so that when a server/responding person sends a message to the other, he won’t be receiving that message, but he will receive messages that we send, as we’re the Man in the middle.
This might help you understand:
A man in the middle attack!
Starting the attack 

To start, enter the following command in a NEW terminal window:
  • sudo echo 1 >> /proc/sys/net/ipv4/ip_forward
This will forward your IP address. Now we’re starting the MITM by opening a NEW terminal window and entering this command:
  • sudo arpspoof -i [Interface] -t [target] [default gateway]
If you don’t know your interface and default gateway, start a new terminal and enter: ifconfig.
This is the result form the arpspoof.

Open (once again ) a new terminal window and enter the following command:

  • sudo arpspoof -i [interface] -t [default gateway] [target]
Another result from the arpspoof!
Note: After you entered both the arpspoof commands DON’T CLOSE THE TERMINALS.

Step 4 : Firefox and Wireshark (Almost finished)

We need a few more things in order to complete this hack!
First install Firefox,
then Greasemonkey and the cookie injector script. Then, install Wireshark, which you can do by entering this command into a terminal window:
  • sudo apt-get install wireshark
After that, open up a Wireshark session (open a terminal and enter sudo Wireshark as command). Select your interface and start capturing. At the top, you should see an input box where you can add filters. Now enter this filter:
  • http.cookie contains DATR
Now you should get a list in Wireshark. Search for a cookie that contains the text GET. Locate it, click on it with the left mouse button, select copy, select bytes, select printable text only.
Wireshark result. The one you need is in the black circle.
Now go to Wireshark and go to Facebook. Make sure you’re NOT logged in. If you are, go to settings and delete all the cookies. Then go back to the Facebook log-in page, press [ALT]+C, and paste the cookie. Press OK andrefresh the page.
Here you can clearly see the cookie injector script input box.
If my magic worked, you should see the main Facebook timeline. If not, then you’ve done something wrong. Check the steps one again and try again. Don’t Give it up 
This hack may seem advanced, but it’s actually really easy. Once you break down all the steps, it’s a piece of cake! 
Now that you’ve done this, it should be clear that Facebook security isn’t very strong 
In my next post i am going to write about How yo Hide Ip and other simple stuffs so Don’t miss them

1/31/2014

Change the fb page name after 200+ likes

http://www.jackrabbitblog.com/wp-content/uploads/2013/10/facebook-fan-pages.jpgHi friends,today i am going to tell how to change the Facebook fan page name after getting 200+ likes . normally we can’t change the name of our Facebook page after getting 200 likes but with a small trick we can change it. Lets see how t do this 
Now the main question if it not possible to change name after 200 likes then i how it will be possible. Don’t worry its quite simple.
Facebook introduce a new features about Request them to change name but this feature is still available in few countries only like US, Canada may be in beta testing. If you are in that countries and just wait for months to get option in your place but i don’t feel that as good part. We should have to make effort instead of waiting. So if you want to know about how this method works then follow below steps carefully.
  • Firstly you have to install Firefox Add-ons your browser to install Click here to download it
  • For other Browsers Add any US server proxies in your Browsers IP address settings.
  • For Firefox users after installing add-ons. New Icon will appear on your browser simply click on them and mark as Active.
Firefox add-ons
  •  After activating Add-ons, Log In your Facebook account
  • Then Open that page whose name you want to change. Go to Admin Panel >> Edit Page >> Update Page Info.
  • Now in Category Option change them into local business.
fb page category
  • After changing categorical click on Edit Page Name Button.
  • Then you will see the option of Request to Change Name.                                                                                        
  • Click on that option and new form will appears about Change Name Request.
  • Tick the button for accepting the page guidelines of Facebook.
  • Then select the type from the menu about your page currently representing.
change name Form
  • Then tick on the button that you still want to change the name of page.
  • Add Accurate information in all the fields like Current Page Name, Desired Page Name which you want.
  • Select the accurate reason why you want to change Page name from menu.
  • Upload any document which represent that your business is changes, or you page is misspell of your business. Always upload document based on the reasons you have selecting in previous step.
(Suppose if you don’t have any document or you just want to change name of your any fans page simply select the category Misspell and upload your cover image :D Thismethod is also working.. lol )
        

  • Then tick both option for proceeding request and click on send button.

After requesting change name you will receive email in your email account associate with Facebook account from where you request change name. This email may take 3-7 days about response back on your request. If your request will get accept then your page name will be change automatically to the name which we added in desired name.
Its simple isn’t it Don’t be selfish share this resource with your friends and keep touch with me for cool tutorials