Showing posts with label OTHERS. Show all posts

4/23/2014

How to Access Blocked Websites, View Restricted Sites

Most of us find ourselves in situations where a website we wish to visit is blocked by a software or by our ISP (Internet Service Provider). So the question arises, how can we access blocked websites? The answer to this is simple: Proxy websites. Before going into details, let us know a bit about these proxy websites. 

Proxy Websites

A proxy website acts as an intermediate source between the user and server the site being contacted is hosted on. Users send requests to proxy websites which conveys them to the site's server. The reply received by the proxy website is then forwarded to the user's computer. This gives an impression to ISP's and blocking software that the user is visiting the proxy website but in reality, s/he is visiting the site which was blocked. Thus, proxy servers also provide extra security to users by hiding their online activities from their ISP's.

Acess Restricted Websites

Commonly Blocked Web Sites

The sites which are most commonly blocked at workplaces, schools and offices include websites like Facebook, Orkut, Blogger (blogspot), Google News, Typepad, eBay, MySpace, YouTube, MSN, Yahoo! Messenger, Bebo, Google Talk, Gmail, Photobucket, AOL AIM, Flickr, Twitter etc. In some countries, social bookmarking sites like Digg and Reddit are also blocked. Countries like Saudi Arabia, Pakistan, China have even blocked access to mainstream media websites like The New York times. A proxy website can be used to easily access these blocked websites. As proxy websites hide a user's location, they can also be used to access popular websites which are restricted to particular countries and block users from other countries from visiting them.

Types of Proxies

There are two types of proxies. First, there are web proxies which have an interactive interface; and second, the proxy servers which work on the basis of IP Addresses and port numbers. Proxies can also be segregated on the basis of anonymity into Anonymous, Transparent and High Anonymous depending upon the amount of privacy they provide.

How to Find Proxy Websites and Proxy Servers

A simple Google search containing the word "proxy websites" is likely to return a lot of useful results. However, most of them are likely to be lists containing proxy servers which you can setup using their IP Address and Port Number. So, in order to find interactive proxy websites, you will have to search for something like "Facebook Proxy Server" or "Orkut Proxy Server". A search like this is most likely to return interactive proxy websites with which you can access your blocked website by simply entering the URL in URL field. If you want additional security and anonymity, you can opt for a paid proxy server.

If you do not want to search, here are few popular free proxy websites you can use:-
  1. http://www.hidemyass.com
  2. http://www.spysurfing.com/
  3. http://proxify.us/p/

How to access Blocked websites

How to Setup Proxy Servers using their IP Address

If you wish to visit your blocked website using a web proxy, you do not need any setup. However, if you wish to use a proxy server that can only be accessed by using its IP address and port number, you must configure your browser to use it. Follow the instructions given below to setup this type of proxy in your browser:-

Google Chrome and Internet Explorer Users

Google Chrome uses the same network settings as Internet Explorer. So, in order to configure Google Chrome to use a proxy server, you have to configure Internet Explorer. You can configure a proxy server in Internet Explorer by following the instructions given below:-

  1. Start Internet Explorer.
  2. Click on Tools, Internet Options.
  3. Click on Connections Tab, select your Network Connection and click on Settings.
  4. Check on Use a Proxy Server for this Connection.
  5. In the Address field, add the IP Address of your Proxy server. In the Port field, enter the Port Number.
  6. Click on OK and OK again.

Mozilla Firefox Users

Mozilla Firefox users can configure their browser to use a proxy by following the instructions given below:-

  1. Start Mozilla Firefox.
  2. Click on Tools, Options.
  3. Click on Advanced Tab.
  4. Click on Network tab.
  5. Click on Settings.
  6. Encircle Manual Proxy Configuration.
  7. Enter the IP Address and Port Number at the appropriate place. In most cases, it will be a HTTP server.  
After you have successfully configured your browser to use the proxy server, you will be able to access blocked websites whenever you browse the internet with your browser.

4/21/2014

JavaScript Tricks: Edit Websites in Browser (Live)

Imagine a world where you are a God and have ultimate control on what happens and more importantly, how it happens. Seems too good a dream. Now it has come true, at least for the online world.


JavaScript tricks
Using this trick, you will be able to edit any webpage live in your browser as if it was a Wiki and change the details according to your wish. Yes, you read that right. You can edit Google or even Facebook for that matter right in your browser and that too without requiring any technical know-how or getting deep into hacking and cracking.

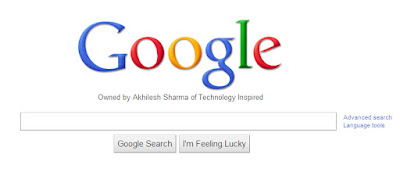
Here is an example picture demonstrating the Google Homepage edited by me to say that I own Google.
Edit Websites Browser

This is just an example. You can use it for anything like showing wrong traffic stats or for fooling people by showing that someone said something about them on Facebook or Twitter. It depends only on your creativity. But I would advise you to stay ethical and use it for entertainment purposes only.

(Mozilla Firefox does not support this. If you use Firefox, you can use the bookmarklets given at the end of this post. If you use Google Chrome and the code does not seem to work, precede it with "javascript:" without quotes.)

To use this trick, all you need to do is just copy the code given below and paste it in your address bar after you have opened the website you wish to edit. And start editing.

javascript:document.body.contentEditable%20=%20'true';%20document.designMode='on';%20void%200
You can capture a screenshot by pressing the Print Screen key or by using the Snipping Tool if you use Windows 7 or Windows Vista. If you wish to again make the website non-editable to give a more authentic look, copy and paste the code given below in the address bar after you are done editing (does not work in Firefox).

javascript:document.body.contentEditable%20=%20'false';%20document.designMode='off';%20void%200

Or, alternatively you can use the following bookmarklets by dragging them to your Bookmarks bar.

1.  Edit this Website

2.  Done Editing

The editing that you do will however be temporary as it is not server-sided. You can also save the modified website through your browser by File>Save. This works on all common web browsers including Chrome, Firefox, Opera and Internet Explorer.

4/19/2014

Convert PDF to Word and Word to PDF with Free Software

PDF and Word (.doc and .docx) are two document formats most computer users encounter on a frequent basis. PDF files have advantages of being platform independent, hard to edit and smaller in size. Word documents on the other hand are easy to edit, format and read on devices that support them. While both of these formats have their advantages, many users have felt the need to convert one to the other to take advantage of the other's features.

There are many paid software and tools that support this conversion, but most of them are too expensive. There are many free online conversion tools as well but either they result in low quality conversion with lots of missing resources or take too much time due to server limitations. Most of these online tools limit the size of files you can convert. Also, many people are not comfortable with uploading their personal files on a third party server.

PDF to Word

In this situation, the only solution to obtain high quality conversion from one format to the other and that too quickly is using a program installed on your PC. There are many free software that support this but the problem with most of them is that they do not offer high quality conversion and result in lots of missing resources. However, there are certain free products that offer quick and high quality conversion from PDF to Word and vice versa. This article contains some such software.

In this article:
1. Convert PDF to Word
2. Convert Word to PDF

Convert PDF to Word

Open Office
The basic version of Open Office that you download from OpenOffice.org lacks PDF operability. To add PDF functionality to Open Office, you will need to install the PDF Import extension. If you have older versions of Open Office, you can use the older version of this extension. LibreOffice, an office suite descended from Open Office has this extension included by default.
Convert PDF to Word

While Open Office does not support direct conversion of PDF files to Word documents, you can use an indirect method to achieve this conversion. To do this, open any PDF document in Open Office Draw and copy all its elements with Ctrl+A followed by Ctrl+C. Now open Open Office Writer and press Ctrl+V and then save the file as a Word document. In this way, you can get a Word document of your PDF file with remarkable accuracy.

You can also directly edit the PDF file with Open Office Draw just as easily as a Word document.

UniPDF
UniPDF is a small free utility that lets you convert PDF files to Word documents with speed and accuracy. It also offers conversion of PDF files to RTF, JPEG, PNG, GIF, HTML and plain text. While it lacks a plethora of features, it is good at what it promises to do; convert PDF files.

Both of these programs run on Windows 8.1, Windows 8, Windows 7, Windows Vista and Windows XP. It is interesting to note that PDF to word conversion is possible only if the PDF file is not a scanned image and was created as a text document.

Online Tools
While the above mentioned offline tools will be enough for most conversion needs, it is always good to have a few options. These online tools provide accurate and fast conversion from PDF to Word.

ConvertFiles: Limits the file size to 250 MB. Offers high quality conversion with OCR support.
ConvertOnlineFree: Limits the file size to 30 MB. Is a good option but lacks OCR support.

Convert Word to PDF

Open Office can be effectively used for this purpose. Just open a Word Document in Open Office Writer and use its Export as PDF option to immediately get a PDF version. Similarly, you can use Open Office to convert XLS and PPT files to PDF as well.

Connect a Laptop or Desktop Computer to a TV Easily

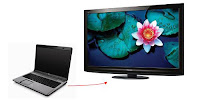
Connect Laptop Computer to Television
Suppose you wish to watch a movie or share a slide-show of pictures with your family on your PC but have a screen that leaves much to be desired. In such a situation, you can connect your computer to a television screen to allow your entire family to enjoy comfortably.


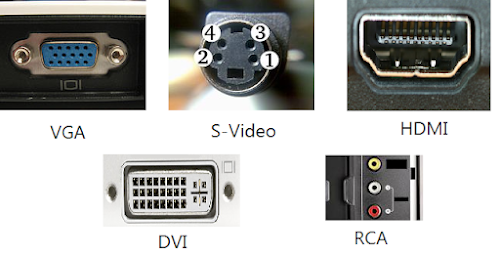
There are many ways in which you can connect your laptop/ computer to a television. However, the overall video quality will be different for different methods. You can choose which one to use based on the quality or the availability of hardware. The first step is to know what type of ports and connections your TV and computer have. If you already know the type of ports and connections available on your hardware, you can directly jump to Step 2. If not, then the different types of ports are explained in detail below:-

Connect PC or Laptop to TV
Different types of PC to TV connection ports
1) RCA/Composite: The oldest and the lowest quality connection available. They are the Yellow, Red and White connections most of us are familiar with. Yellow is used for composite video, white for left analog audio and red for right analog audio.

2) S-Video: S-Video or Super Video offers slightly better quality than Composite connections. As it is one of the oldest type of connections available, most televisions and computers have it. There are two types of S-Video ports, one containing 4 pins and the other containing 7 pins. This type of connection is used only for video. So you will need to connect an audio cable from your computer's headphone jack to the red and white audio inputs on your TV if you want audio to work.

3) VGA(Video Graphics Array): Most computers and televisions have a VGA port. It offers much better quality than S-Video and should be preferred if you have a HDTV. Older CRT TVs however, will not have a VGA port and will require a PC to Television converter. Just like S-Video, VGA also does not support audio and will require an additional audio cable.

Laptop Computer to TV
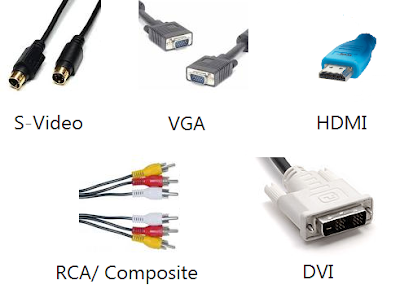
Different types of connecting cables to connect computers to TVs
4) DVI: Digital Video Interface offers much better quality than VGA connections. Most laptop computers and HD TVs will have these connections. Just as the name suggest, this type of connection can be used only with digital TVs. Also like the previous two, DVI connections also require the use of an audio cable for audio to work.

5) HDMI: The highest quality connections available. Most HD TVs will have this connection, however, chances are that your computer would not. If your computer happens to have a HDMI connection port, this should be preferably used. If your computer doesn't, you can use an HDMI to DVI adapter to convert HDMI to DVI.
connect laptop to tv

Step 2: Once a common type of port between the two devices is recognized, you will need the right connector cable to physically connect them. The different types of connector cables are pictured above. If you do not find two matching types of connection ports, you will need an adapter to make the connections type match.

Step 3: After connecting the two devices, on your TV, select the external input with which your TV is connected to the computer. It may be HDMI1 or AV1 depending on how you have made the connection. This is much similar to how you select input from your DVD player.

If you have followed the steps correctly, your TV should now be displaying your computer's screen.

Important: If your computer is not recognizing the external display, you must connect the TV before starting your computer. If the picture appears distorted, you will need to change the screen resolution of your TV by altering the display settings from your computer. Most older TVs will support only one display resolution while newer TVs will support plenty of them.

4/18/2014

Idea Free Inrernet Trick 2014

Welcome back friends. Today we are giving you a trick to run Free Internet In Idea latest Trick of 2014. Just you have to fill following settings.


Change your IDEA GPRS Setting.

APN :- mmsc OR imis
Proxy :- 010.004.042.015
Port :- 8080
Homepage : - https://concealme.com
OR
https://freemenet.com
OR
https://flyproxy.com
OR
 https://kproxy.com


it's done and working with great speed. 

It is also work in Computer with great speed

Idea Free Inrernet in Computer 

for using in Computer connect ur modeam or phone via Idea Mms (mmsc) then open the firefox and go to the

Tools>Option>setting>and click on manual Proxy

Fill following setting.

Proxy :- 010.004.042.015
Port :- 8080

Now save and restart Computer. Finally it is Free like bird with very fast speed.

Note  :-  Try at low balance (below 1rs).

Vodafone Free Internet Without Any Proxy Latest Trick 2014

Welcome back Friends. Here we are giving you a latest Trick of 2014 to Use Free Internet in Vodafone without any proxy. Yes Vodafone free GPRS comes without any proxy port or handler app.
You have to follow few steps.


Step 1 - Activate Vodafone connect by help of customer care.

Step 2 - Bring Vodafone sim away from state there you have activated.

Step 3 - Make roaming to the state where you are living.

Step 4 -  Now reduce balance to 0 by calling or any thing else.


Step 5 -  Call 111 for at least 10 sec ,

Step 6 - Now you have activated free Vodafone connect .

Step 7 -  Make home page Setting as :- google.co.in

no need to set any proxy port
apn :- www

it's done and working with great speed.

Vodafone Free Calling Mini Trick latest 2014

Welcome back to our Blog SOFTQQ. Which provide you latest Tips and Tricks. Here is Vodafone Free Calling Mini Trick Latest 2014.

Vodafone Provide 100 local min in Punjab.
Send PORT mobile no.
ex : PORT 7837464908.


after 1 hour they call and request you to not leave there service and give 100 min for 3 month.
when the min are finish then call customer care to deactivate all service.

then on next day send message again and enjoy free calling.

4/15/2014

XnConvert 1.20


A simple yet powerful image converter for graphic files, photos and images.XnConvert is a cross-platform batch image-converter and resizer with a powerful and ease of use experience. All common picture and graphics formats are supported (i.e. JPG, PNG, TIFF, GIF, Camera RAW, JPEG2000, WebP, OpenEXR) as well as supporting over 500 other image formats.Also available within the batch operations include rotating, adding of watermarks, adding of text along with many image-adjustment features such as brightnes


OS Requirement Windows XP, Windows 2003, Windows Vista, Windows 7
License Freeware File Size                 8.1 MB
Version 1.20
Date Added Fri 06, 2012 at 04:37 pm


                              http://download.xnview.com/XnConvert-win.exe

3/17/2014

Tips for improving your Gmail productivity

Gmail is one of the most popular online email services in the world. It offers great capacity and seamless integration with other Google tools like Google Drive, thanks to which you can send huge file attachments. It also has an app for iPhone and Android.
But Gmail isn't perfect. Or maybe it's the way we use it. Regardless, the point is that it can be hard to get your inbox under control; Gmail can be used for many things, and its become incorporated so easily into our everyday lives, that it feels like our mailboxes will never be emptied or organized.
How can you fight this invasion of emails? Luckily there are several ways to manage your account. Aside from its relatively new tabs feature, add-ons for Gmail, web services, or even settings in Google itself can enhance your Gmail productivity quickly and conveniently. Let's have a look at these tools in more detail to help you get your inbox under control!

Change the style of your inbox

If you don't receive many messages, you've got it easy: read, answer, file, delete, and go. But for those who receive a large amount of mail each day, this isn't enough. With those users in mind, Gmail has implemented what it calls inbox styles: different ways to present the content in your Gmail mailbox so that you can handle large amounts of mail without losing your mind (or any emails).
Gmail inbox type
You can choose from five inbox styles:
  • Classic - the standard, which puts the most recent posts at the top of your inbox.
  • Important first - priority messages from the contacts you interact with the most, as well as other important messages.
  • Unread first - places unread messages above all others.
  • Starred first - places messages that you've marked with a star at the top of your inbox.
  • Priority - a mixture of the three previous options: combines unread, starred and important so that you don't miss anything.

Enable Gmail Labs

Gmail "Labs" is a collection of experimental features that you can activate if you want to test them. Although they might not work very well or could disappear without notice, little gems can be found among them, including some which will help you work faster and more efficiently in Gmail.
Gmail Labs
One useful feature, for example, is the Auto Advance, which will automatically take you to the next message after you delete or archive the previous one, rather than returning you to the inbox.
Smart Tags is another cool feature, with which you can easily organize all messages that you receive automatically, whether they're notifications, newsletters, message forums or emails from social networks. There's also the role of Standard responses, which saves you a lot of time if you have to write similar email messages every day.

Send emails to yourself in the future

One goal of the perfect email manager is to always keep your inbox clean of pending messages - the coveted inbox zero. The theory is simple: answer every email as soon as you receive it, if you can in just a few minutes. If you don't need to do anything, delete it. And if you've finished the task on that email but want to keep it as a reference, file it.
But what happens if you have to go back to that email within a few days, you're done with it, or are waiting for a response from a third party? That's where these tools come into play:

Boomerang for Gmail

Boomerang for Gmail is an extension for Chrome, Firefox, and Safari that allows you to schedule sending emails, meaning you can use them as personal reminders. It also sends you an alert if you're waiting for a response and no one answers your message within a predetermined time-frame.
Boomerang for Gmail
If you get an email asking you to do something that you really need to consult someone else on, you can answer this message, forward it to the relevant person, configure Boomerang to alert you if you don't get an answer within a couple of days, and delete the read message. One step closer to inbox zero!

FollowUp.CC

This curious name belongs to a service that's pretty similar to Boomerang; the only difference is that you don't have to install anything because it works on any browser. The downside of FollowUp.CC is that the free version has a limit of 20 reminders per month.
Working it is really simple: when answering an email that you want to follow up with in a few days, enter a fake email address with the date that you want to be reminded of into the BCC field. Addresses are created in a logical way:
  • Within a few hours: 12hours@followup.cc
  • On a specified day: apr21@followup.cc
  • A day this week: sunday@followup.cc
  • A specific time: 9am@followup.cc
The email will appear as a reminder in your inbox for the time you've set!

HassleMe

So far, we've seen tools that'll send you email reminders when you want to complete a specific task. But what about reminders for recurring tasks that don't have a set time, like going to the gym, calling your mom or practicing an instrument? For these reminders, there's HassleMe.

HassleMe is an online service that'll send you reminders for recurring tasks so that you don't have to worry about forgetting to do them! It can also be used to send phrases of encouragement or motivational quotes for a little extra push of productivity.

The Email Game

The aim of The Email Game is to turn the monotony of sorting through emails into a game, another example of the popular trend of 'gamifying' non-gaming apps. The Email Game challenges you to manage your email in the shortest time possible and rewards you with points if you're quick enough. If the timer reaches zero, you lose points.

The interface of The Email Game is clear, with large buttons that help you make a decision quickly: can you answer that email now? Do it! Do you have to wait? File it for later! Have you finished? Erase it and on to the next !

2/27/2014

Windows Password Recovery Tool


Size - 31.15 MB

                                                http://adf.ly/crtw7

CCleaner 4.11.4619


 Description

Probably the most popular freeware cleaner globally with over 1 billion downloads since its launch in 2003. Piriform’s CCleaner is a quick and easy to use program which makes your computer faster, more secure and more reliable. CCleaner removes cookies, temporary files and various other unused data that clogs up your operating system. This frees up valuable hard disk space allowing your system to run faster. Removing this data also protects your anonymity meaning you can browse online more securely. The built in Registry Cleaner fixes errors and broken settings to make your computer more stable. The simple, intuitive UI and rapid but powerful cleaning make CCleaner a favourite among novices and techies alike. Professional, Network, Business and Technician Editions of CCleaner are also available for serious users.
Size- 4.54 MB

                                                        http://adf.ly/crtw7


2/21/2014

How to Generate thousands of genuine email ids for free

Hi, here I am once again, with a new trick about How to generate 1000's of genuine e-mail id's with in 5 to 10 minutes , all you have to do is just follow these simple steps  . its up to you that how you want to use them . So be careful about it.  :-)
Requirements :-
LETS START GENERATING E-MAIL ID'S :-
  •  Go to http://www.google.com, click on "Search settings" in the top right corner and change the number of results to display "100" per page, now click on Save preferences.
  • Now in  the search bar type a keyword(s) and the e-mail extension in speech marks For example :- xyz"@gmail.com" What it will do is search for web-pages that contain Gmail e-mail adresses and that are also related  with your keyword. The speech marks around "@gmail.com" make sure that "@gmail.com" is on every web page that is a result of the search.
    • You can also search single websites for e-mail adresses as shown on the example :- site:twitter.com "@gmail.com" The  example shown above will search the whole of twitter.com for"@gmail.com" email adresses. 
  • Now With your results in focus, click the arrow at the side of the AutoPager icon as shown in the picture below. Then goto "Immediately load > All pages" .as shown in screenshot. With your search results still in focus, scroll all the way down and AutoPager should load the next page of results onto the same  page you are currently on. Keep scrolling till all pages have loaded onto the samepage.


  • Press "ctrl + a" to select all of the pages then press "ctrl + c" to copy the results. With the results still in the clipboard (Still copied) go to http://www.skymem.com/ or Click here  . Paste your results into the first box which says "1. Put text with email addresses here:" and just click on Start Extracting Emails Button on top of that box. The settings should already be correct with "unique emails" and "sortticked" So no need to Touch that option. 

  • The e-mail adresses should show in the Results box (3rd box)  almost instantly.
  • Now copy the results from the results box paste them into Notepad. Sometimes the e-mail address seem to end in ".com." instead of just".com" so in notepad go to "Edit > Replace" and in the "Find what" text-box type ".com." without the  speech marks("") in the "Replace with" textbox type".com" , without the speech marks.

2/10/2014

How to Unlock Android Phone Pattern or Password Lock Easily - Step By Step Guide

Android lock screen is a very strong protection of data on any android device. There may be times if you forget your pattern and want to reset it, this article shows how you can unlock your android pattern lock screen with very simple steps. This is an educational article. Try this at your own risk. This website is not responsible for any issue which may occur.


Steps to Unlock Android pattern lock:

1.Enabling USB Debugging:

For this process to be a success, the device which you wish to unlock should be enabled with USB Debugging. For this go to Settings->Development->USB debugging and enable it.

2. Connect the device to the computer:

Now after making sure that the device is USB Debugging enabled, Connect it to the computer.
  • Go to start and open CMD.
  • Type the following code very carefully.
adb shell
  • Now press enter
rm /data/system/gesture.key


3. Reboot:

After giving the commands in the CMD, restart or reboot the android device. Now give any pattern and your device should be unlocked.
If you any doubts in the above process, please feel free to contact us. 

How to Play PS3 Games on PC or Laptop - Windows 7/8/XP

Well, we all love the games which are available for our ps3. These games just drive us from the world of reality to the world of games where we are much more than what we are in real life. The graphics, sound, gameplay, animation and everything about these games are just thrilling and causes an adrenaline rush within our bodies. Everything about these games just sounds perfect and are a great stress buster for many of us, but the problem which frequently arises is the availability of a ps3 everywhere.


We need a thing which can be available everywhere we go so that we can enjoy these games. Well the answer to this problem is that we can play the games on our PC. Well, we all can find a PC most of the places. Now the problem which arises is how can we play the same games that we play on our PS3 on our PC. Here’s the solution!
     Must Check: Play PS2 Games on PC

How to play ps3 games on PC

To play the same games that we play on our ps3 for our PC the thing which we have to do is we can use anemulator with whose help we can download the gigantic games on our PC in the form of RAR files and then extract it. There is emulators available online for most of the games. So one needs to have an emulator for playing the ps3 games on PC. It's as simple as that.


Problems faced during this:

  • The main problem faced even while using a simulator is that the configuration used in the play station’s are the most exotic ones of all. One has to have a PC which has the highest and the best of all the configuration available to play these games. Even after having all the best of configurations there is no guarantee that the game will run as smooth as it does on a ps3 or that you may get the same thrill that you get on the ps3.
  • In reality, most of the simulators that you will find on the web will ask you for subscription for extracting the RAR files and there is no guarantee that it will work because there are mostly no emulator’s present for ps3 games.
  • There are genuine emulators available for ps2 models, mostly not for ps3. So if you are going to get one for a ps3 game you should check everything before you proceed.

The conclusion

Well, at last the thing which has been cleared from whatever we have shared with you is that if you want to play ps3 games on your PC, then you just have to get the appropriate emulator from the web. But it is hardly possible for us to play them on PC as the software and configuration used in ps3 is much more advanced than that, there are available for PC so be sure that you will be in a position to play them on your PC.

Make A Autorun File For any Cd

We got several messages in our page asking how to create auto run CD 's  so this post s for them .Did You Notice, whenever You Insert any game 0r software cd, or simply consider Windows Xp,or windows 7 Operating system cd.
As soon as You Insert the disk in CD-ROM, It automatically runs the cd.

If you want to make a autorun file for that CD you are ready to burn just follow the steps
1) You open notepad
2) now you writ: [autorun]
OPEN=INSTALL\Setup_filename.EXE
ICON=INSTALL\Setup_filename.EXE

Now save it but not as a .txt file but as a .inf file.

But remember! The "Setup_filename.EXE" MUST be replaced with the name of the setup file.
And you also need to rember that it is not all of the setup files there are called '.exe but some are called '.msi

3) Now burn your CD with the autorun .inf file included.

4) Now set the CD in you CD drive and wait for the autorun to begin or if nothing happens
just double-click on the CD drive in "This Computer"

How to Bypass SMS Verification online on Websites for Free - Best Sites

We must have often faced a situation where we have been asked by a site before opening our account or do some other works that they ask for a verification code to be entered before one can proceed further with their work. This a very old technique used by sites mainly for security purposes. This method helps the sites to put an end to the spammers and gives a whole new layer of security for the users. The other side of the coin is that this technique is also used by the sites as a way of advertisement and helps in their promotional activities as this is the best and the biggest user administrator interaction ground.


What is bypass of SMS verification??
Bypass of SMS verification means that the process by which one has to enter their mobile numbers to get verification code which can be used to activate their accounts can be surpassed by a simple technique. 

Why to bypass SMS verification??

Well, most of the times they are for our security and even when they are used as for advertisement purposes, they do not cause a lot of problems for a person. But sometimes the numbers entered can be hacked and known to hackers who can use it for unwanted purposes and also sometimes the spammers go far ahead by sending spam advertisements to our cellular devices. So these are mainly the reasons one need to bypass the online verification SMS.

How to bypass the SMS verification online??

This question has a simple answer one can easily achieve this by following some simple steps which are shown below and this does not take much of one’s precious time.
  • Firstly, one has to go to any of below sites
  • Secondly, one has to choose any one of the number which is available over there.
  • Then one has to copy that number which we have chosen and paste it over the place where we have been asked for entering the number on which the verification code has to be sent to.
  • Then it is pretty simple, we just have to come back and click on the chosen number at once and check across the whether any site has sent any verification code for you on that number or not.
  • Now just enter the code which one has received on the number chosen onto the website where the code has to entered and finish. One has successfully completed by passing SMS verification online.

A word of advice
We should always remember and keep in mind the fact that we should never use these online numbers for any banking purposes or for your e wallet as this can prove to be very dangerous for the user is something goes wrong in the due process. The next thing we would like to say that we should use this technique of SMS by passing only at certain times and not always as this verification process provides a very important security cover for all the users.

Resize Image without loosing Quality – How to Guide

http://static.ddmcdn.com/gif/file-compression-ch.jpg
People hate to visit websites which require more time for loading. So one should always seek to improve the webpage load time, so to do so you have to look at many things like loading sources, page cache, media files etc. One among such media file is images, adding beauty to your page, but at the same time, it is regarded as the most bulky resources which takes much time to load on the page, thereby causing inconvenience to the visitors.
But one can improve the page load time by cutting the size of an image to a significant amount. But even resizing the image without any proper knowledge may be troublesome as you may lose the quality it had. Though photoshop provides a nice feature to save the original quality of the pic, it is not preferred much as it’s too expensive to purchase the photoshop application for desktop or web version. So here I’m going to provide you with free online tools to Resize Image without loosing Quality

Web Based Tools to Resize Image without loosing Quality

1.Kraken.io :

JPEG, PNG, GIF, SIV are some of the image formats that can be compressed with this online application. This reduces the image to a quite considerable point without losing the image size.
This application is also available in Chrome and Firefox extensions

2.Imageoptimizer.net:

After uploading the image from your computer, give the size of the image and quality you wish to have after processing. This provides only some control of the output and compression ratio But Greatly Helps to Resize Image without loosing Quality.

3.Smush.it:

Smush.it is the best and popular online application you can have to compress images. It is present with an up-loader as well as URL box to have the image. In this you will not be provided with the ‘enter’ option to enter the image quality as that of previous one because it automatically optimizes the image by compressing it to a limit.

4.Compressjpg.com & Compresspng.com :

I would suggest you to have these application, for more control of the image quality. A slider appears as soon as you upload an image to auto control the quality of the last image. A preview panel is provided for showcasing the changes according to the quality slider change. So before downloading the image you can have the review of your final image. This application is available on different domains for JPG and PNG images.

5.Punypng.com :

This application is available to compress the PNG files. Upload an image and you can get a compressed size of the image. Besides this, tinypng.com , a quick tool to compress the PNG images to the best level without affecting the image quality.

Desktop tool to Resize Image without loosing Quality

If you need a Desktop tool to do this task then i would suggest you to have PNG Gauntlet as your first choice, You will need .Microsoft Net Framework 4.0 to run this tool on your Windows.


You won’t Face any difficulty in Using this tool as it is very User Friendly. While Optimizing the images PNG Gauntlet will show you older size and Optimized size of the image. this Program is not that Fastest at it work but Usefull.

What to Do When My Iphone Got Stuck or Hanged?


when your iphone got stuck while playing any games or using any apps.you try to do power off but its does not work.you can reset you iphone with in few seconds.It's very simple and easy follow the below steps.


Step by Step to Reset iphone:


  • just hold home screen button at end and sleep/awake button on top together just like below screen capture

  • while you holding both buttons together after some time you can see you iphone shuts off and you can see apple logo

  • Now your phone is rebooting.this may take some time don't get tensed.
  • That's it now you are done.

2/07/2014

6 Free Sites for Creating Your Own Animations...

1. GoAnimate


For animators who would rather put in a little time rather than settle for a mediocre movie, GoAnimate is the way to go. The site offers enough customization to fully express creative genius, but it's easy enough to master without any actual animation or technical skills.
For almost every component, the website offers a choice between complete customization and a library of already configured objects. Users can either choose a character or make a completely customized one; they can choose a soundtrack or upload one; they can have the computer speak the dialogue or record it themselves. All of these components are laid out visually on an easy-to-navigate timeline.
There's also an interesting community feature similar to many social media sites. Users can collect followers, earn badges and send messages to one another. Personal dashboards track how many people view your animation, which is way more fun than feeling like you're sending your brilliant clip into cyber thin air.

2. Devolver

Dvolver
Devolver streamlines the animation process into a quick, six-step multiple choice project. Choose your background, characters and one of four plots; type in some dialog; choose some music; and — voila! — you have an animated movie. Despite the extremely limited customization options, it's actually not a bad looking cartoon.
It's quick to e-mail your animation to a friend, but they will need to visit the Devolver site in order to watch the movie and there's no option to download. This aspect, paired with the fact that the dialog is really the only thing you can customize, makes this site more like a more exciting way to send an e-mail message than an actual animation; much like a customized e-card. Still, there are a bunch of situations that could warrant this of animation — an inside joke, a prom date request.

3. Animasher

animasher
Instead of assigning actions to characters via a drop-down menu, Animasher users just hit a record button. Any movement that they create by dragging and dropping the images will be played back. Animators can compile multiple scenes of these moving images to complete a story.
It's a pretty painless way to make a movie, but there are some drawbacks. The images move but aren't actually animated, so it's difficult to accomplish changing expressions. As a result, the animation comes out looking more like a puppet show than a movie.
Some tools that make the site more interesting are the ability to add your own images, record dialog with a microphone and add video clips. If you like the scrapbook-like look and process, there aren't any better, free options out there without downloading or having actual software knowledge.

4. Xtranormal

Xtranormal
As far as visual quality goes, this site is impressive (which is probably the cause of the slow preview load times). The workspace is a little different than the other animation sites mentioned in this article. All character movement, sound bytes, expressions and gestures are added directly into the script where you type the dialog.
Unfortunately, the site's options for free use are limited. Sarah Palin is one of two default characters in the "Starz" theme, for instance, but any other choices require cash commitment before you're able to publish your animation. The same is true for "premium objects," like different backgrounds that you're able to preview but not publish, unless you pay. As evidenced by the site's YouTube channel, there are definitely opportunities to makes some pretty cool movies, but the free version seems limited.

5. Voki

Voki
You can't create much of a story with Voki, but you can create an animated speaking avatar. The site is extremely easy to use. Just choose a character base (choices range from Uncle Sam to classic normal-looking people), adjust the background and colors, and add a voice. To put words in your avatar's mouth, you can either call a number and leave a message, type out a greeting and let the computer generate a voice with the accent of your choice, or record a message with your computer's microphone. When you're finished, you can embed the code in your website or e-mail your message to a friend.

6. Zimmer Twins


Remember those choose your-own-adventure novels? This animation site applies the same concept to short cartoons. The site partners with Teletoon, a Canadian animation channel, to give children a starter in animation.
The site challenges you to use its animation tool to finish the stories, which chronicle the adventures of siblings Eva and Edgar. The best finished stories are then recorded by voice actors and turned into TV spots.
Which site was your favorite? What animation sites do you use? What features would you love to see in sites like these? Let us know in the comments!

2/04/2014

How to recover a USB drive

How to recover a USB drive
We've all been there - you copy files to your USB drive and eject it from your computer before the operation has finished. It's exactly this action that almost always ends in disaster: when you plug in the USB drive again, Windows can't open it.
What happens when you remove a USB drive before properly ejecting it? The device runs the risk of becoming inaccessible. The discontinued operations can damage the partition table; basically, it's like taking the door off of a room.
Luckily, there's Partition Wizard, a free disk partitioning tool which can repair all types of storage units. In this short tutorial, I'll explain how to use it to recover a USB drive that can't be read.

1. Connect the USB drive

Recovering lost partitions is only possible if the device is recognized by the computer. A new icon should appear in the list of drives in your PC. If the partition table is damaged, you won't be able to open the files on the device.
USB insert a removable disc
Instead of folders, you'll see a notice similar to the one above, saying "Please insert a disk into the Removable Disk drive" or perhaps another warning to "Format the disk in the drive to use it."
Format USB to use
The error you see depends on the type of problem you have with the disc, but the result is always the same: you can't view previously stored data. That's when Partition Wizard comes to the rescue.

2. Install and run Partition Wizard

Download the Partition Wizard installer and run it. Follow the steps to install and launch the program. Please note that you'll need administrator permissions.
Partion Wizard 7

3. Find the damaged unit

Partition Wizard shows all devices in the central panel. The USB flash drive or SD card you want to repair should be displayed without any partition, or with a partition absent (if you have more than one). Write down its drive letter and size.
Partion Wizard 7 Main Menu
The USB drive is shown with all its space "unallocated", but the data is still there

4. Launch Partition Recovery Wizard

Partition Wizard can be launched from both the side task pane and from the Wizard menu on the top menu bar.
Partion Wizard 7 Partion Wizard

5. Select the disk to recover

The first thing you need to do in the recovery wizard is to choose the damaged unit. Click on it and then click the Next button.
Partion Wizard 7 Select disc

6. Scan the entire disk for partitions

Partition Wizard can scan the entire disk or only part of it. Because it' a small USB, chose the full scan again and click Next.
Partion Wizard 7 Scanning Range

7. Select the scan method

Partition Wizard has two disk scanning methods: Quick Scan and Full Scan. The quick scan is the best choice for most situations. Only use the full scan if the Quick Scan doesn't find anything.
Partion Wizard 7 Scanning Method

8. Choose the partitions you wish to recover

On the next screen, Partition Wizard will show you the partitions found during scanning. Normally, you'll only see one. Choose the partition by marking its check box and click Finish.
Partion Wizard 7 Choose Searched Partitions
Note that if the disk has been partitioned many times, you may also see the remains of old partitions. Select the partition that seems most accurate.

9. Apply changes and enjoy your drive!

Partition Wizard won't repair the partition table until you click Apply Changes.
Partion Wizard 7 Apply Changes
You'll be asked to confirm the implementation of the changes. Click Yes and wait for Partition Wizard to complete the operation. At the end, your device should be fully accessible; reconnect again if it isn't.

An effective repair in less than two minutes

In my case, I recovered a 2GB USB stick whose partition table I had accidentally deleted. From the moment I opened Partition Wizard to having actually recovered my files, it only took two minutes.
The time it takes for you will depend on how big the USB drive that you want to recover is, but the method is the same, and can be used for other types of devices, such as classic hard drives.