4/19/2014

Useful Keyboard Shortcuts for Windows Computers

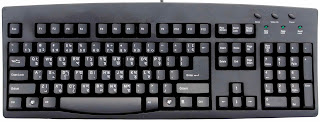
Keyboard Shortcuts WindowsWhile most of us are already aware of obvious keyboard shortcuts like “Alt+F4” and “Ctrl+C”, there are some obscure shortcuts which most of us tend to overlook. These keyboard shortcuts are not only useful for the average PC user but for advanced users as well. This article contains many such amazing keyboard shortcuts which if used properly could save a lot of time and effort. So let's get started.

Windows key+D: This shortcut is the keyboard equivalent of “Show the Desktop”. It is useful for quickly minimizing every open window when someone walks in and you are doing some private work.


Ctrl+Shift+Esc: This shortcut directly starts the task manager. While Alt+Ctrl+Del used to bring up the Task Manager in Windows XP and earlier versions, in Windows 8 and Windows 7, it just brings up the lock this computer screen.

Ctrl+Click: This shortcut is useful for opening a link in a background tab. This is useful when you have to load a page without leaving the current one.

Alt+Print Screen: takes the screenshot of the current active window as opposed to just Print Screen which takes the screenshot of the entire screen.

Shift+Click for Yes to All and No to All: If you have a lot of dialog boxes asking yes and no question, just shift+click Yes or No on one to yes all or no all.

Ctrl+C on an error dialog box to copy its contents: Suppose your computer is giving an error message and you want to copy its contents to send to the support guy, what do you do? Just press Ctrl+C while the dialog box is highlighted and its contents will be copied to your clipboard.

Ctrl+T: This keyboard shortcut opens a new tab in internet browsers.

Ctrl+Shift+T: Reopens the last closed tab.

Ctrl+Shift+N: This shortcut opens a new incognito window in Google Chrome.

Ctrl+Shift+P: Opens a new private window in Mozilla Firefox.

Alt+Enter after writing the domain name in the address bar of your browser to insert .com automatically.

Shift+Enter inserts .net domain name extension.

Ctrl+W: This shortcut closes the current tab in your browser quickly.

Ctrl+Backspace: This shortcut deletes the last word you have typed. It is useful in case you typed in a wrong word and want to delete it quickly.

Ctrl+Left or Right Arrow key: This shortcut allows you to move the cursor one word at a time instead of the default one character at a time.

Ctrl++: This shortcut allows you to zoom in web pages in web browsers. Useful when text on a web page is too small to read properly. Ctrl+Scroll wheel can also zoom in documents, file thumbnails and icons in Windows 8, Windows 7 and Windows Vista.

Ctrl+-: This shortcut does the reverse of the previous shortcut.

Ctrl+0: Reset the webpage's zoom.

Windows key+M: Minimizes all the open windows.

Ctrl+L: This shortcut allows you to quickly jump to the address bar of your web browser.

Windows key+Pause/Break: Quickly open the system properties dialog box.

Ctrl+Shift+Delete: This shortcut opens the option to delete your browser's history, cookies, cache and other details that it stores while you browse the internet. This shortcut is extremely useful for the privacy conscious.

Windows Key+L: This shortcut locks your computer.

Ctrl+H: makes the history appear.

CTRL+B: Bold CTRL+U: Underline CTRL+I: Italic.

Alt+Select: This shortcut allows you to select rectangular blocks of text in Word processors, something that is not possible with simple select.

F2: Allows you to rename the selected file.

Holding Shift while inserting a device with removable storage prevents automatic run.

Ctrl+F: This keyboard shortcut opens the Find option in any program.

Ctrl+S: If you are working on a software and want to quickly save your progress, this shortcut will come in handy.

Ctrl+Home and Ctrl+End: Useful for quickly going to the top and bottom of a page.

Ctrl+P: Useful for printing the current page.

Space Bar: While viewing a web page in a browser, pressing space bar moves the page down.

Alt+Tab: Useful for quickly cycling between running applications. Press along with Shift to cycle backwards.

Ctrl+Tab: Cycle between tabs in your browser.

Ctrl+F5: Clears the cache and refreshes the current tab.

Shift+Right click: Open alternate right click options.

Alt+Double click: Open the file's properties. Alt+Enter can also be used for this.


These are some keyboard shortcuts that I found extremely useful. If you know some more useful keyboard shortcuts, do mention them in the comments.

Install Windows 8, 8.1 or 7 from a USB Flash drive

Windows is sold in the form of DVDs and downloadable ISOs. The Windows DVD can be put into an optical drive for easy installation. However, with the advent of ultra portable devices and tablets that do not have optical drives, installing Windows from the setup DVD becomes a problem. The only solution for these devices is to install Windows from a USB device such as a flash drive.

There are many other reasons why despite having an optical drive, you might want a bootable USB device for installing Windows. One is that installing Windows from a flash drive is a lot faster than that from a DVD. Creating a flash drive for installing Windows is not as simple as copying the setup files to it as it will not be bootable. To make it bootable, you need to use special software.

There are many third party software to create bootable USB devices but given the fact that most people aren't comfortable with third party software, Microsoft has released an application called Windows 7 USB/DVD download tool. Although the program's name makes it feel that it only supports Windows 7, that isn't really the case. It works well for preparing a bootable USB device for installing Windows 8 and Windows 8.1.


Install Windows from USB Flash drive

Before you begin, you must make sure that your flash drive has a storage capacity of at least 4GB. Also, you need to make sure that you have an ISO file of the Windows setup DVD with you. If you do not have the ISO file, then you need to create an ISO file from your setup DVD using a free program like ISOCreator.

Steps to Install Windows from USB flash drive


1. Install Windows 7 USB/DVD download tool. To install this program, you need .NET Framework version 2.0 or higher. The program runs perfectly on Windows 8, Windows 8.1, Windows 7, Windows Vista and Windows XP. Also, you need to be in an administrator account.

2. Open the program. Enter the location of your Windows ISO file in the source file box. Alternatively, you can browse to it and click Next.

3. On the choose media type screen, select USB device to create a bootable Windows installation flash drive.

4. On the insert USB device screen, select your USB flash drive or the external hard drive to which you want to copy the setup files and click Begin copying. If your USB device does not have enough space, you will be shown a dialog box saying so. Click Erase USB device. This will format your USB device and delete all data on it.

Tip: If you accidentally delete the data in your USB device in the previous step, you could still recover it with free tools.

5. If everything goes right, you will see a Bootable USB device created successfully message on the next screen.

6. Now, you need to boot from the USB device you just created to start the Windows installation process. If your computer doesn't boot from it, you might need to change the boot order. Also, you must note that older computers won't boot from a USB drive that is formatted as NTFS which is what the Windows 7 USB/DVD download tool formats it into while you select Erase USB device option. To overcome this, you should make sure that your device is formatted as FAT32 and has enough disk space.


If it complains that it is not a valid ISO file, you need to make sure that your Windows ISO is original and has not been modified in any way. If you are still unable to install Windows from a USB drive, just add a comment.

Art of Illusion 2.9.2


Art Of Illusion is a 3D modeling, animation and rendering program. It is written completely in Java, so it can run on as many different types of computer as possible. Using Art Of Illusion, you can ‘render’ (create) images in formats such as JPEG, PNG and TIFF, as well as videos in QuickTime format. Using further tools other video formats such as MPEG and DivX can also be produced.Requirements: Java 1.5 or later


OS Requirement Windows XP, Windows 2003, Windows Vista, Windows 7
License Freeware File Size 7.4 MB
Version 2.9.2
Date Added Wed 10, 2013 at 03:23 pm

               http://sourceforge.net/projects/aoi/files/latest/download

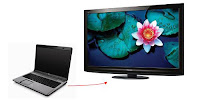
Connect a Laptop or Desktop Computer to a TV Easily

Connect Laptop Computer to Television
Suppose you wish to watch a movie or share a slide-show of pictures with your family on your PC but have a screen that leaves much to be desired. In such a situation, you can connect your computer to a television screen to allow your entire family to enjoy comfortably.


There are many ways in which you can connect your laptop/ computer to a television. However, the overall video quality will be different for different methods. You can choose which one to use based on the quality or the availability of hardware. The first step is to know what type of ports and connections your TV and computer have. If you already know the type of ports and connections available on your hardware, you can directly jump to Step 2. If not, then the different types of ports are explained in detail below:-

Connect PC or Laptop to TV
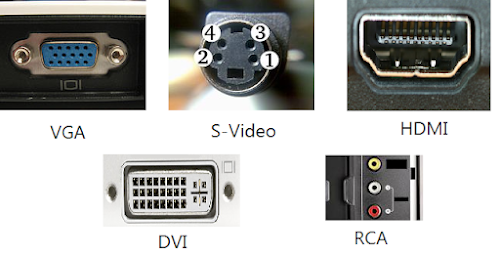
Different types of PC to TV connection ports
1) RCA/Composite: The oldest and the lowest quality connection available. They are the Yellow, Red and White connections most of us are familiar with. Yellow is used for composite video, white for left analog audio and red for right analog audio.

2) S-Video: S-Video or Super Video offers slightly better quality than Composite connections. As it is one of the oldest type of connections available, most televisions and computers have it. There are two types of S-Video ports, one containing 4 pins and the other containing 7 pins. This type of connection is used only for video. So you will need to connect an audio cable from your computer's headphone jack to the red and white audio inputs on your TV if you want audio to work.

3) VGA(Video Graphics Array): Most computers and televisions have a VGA port. It offers much better quality than S-Video and should be preferred if you have a HDTV. Older CRT TVs however, will not have a VGA port and will require a PC to Television converter. Just like S-Video, VGA also does not support audio and will require an additional audio cable.

Laptop Computer to TV
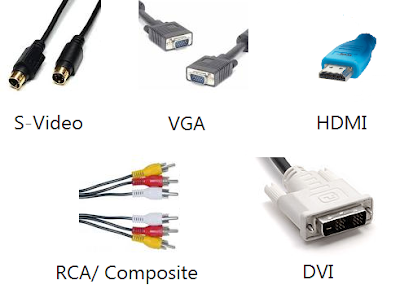
Different types of connecting cables to connect computers to TVs
4) DVI: Digital Video Interface offers much better quality than VGA connections. Most laptop computers and HD TVs will have these connections. Just as the name suggest, this type of connection can be used only with digital TVs. Also like the previous two, DVI connections also require the use of an audio cable for audio to work.

5) HDMI: The highest quality connections available. Most HD TVs will have this connection, however, chances are that your computer would not. If your computer happens to have a HDMI connection port, this should be preferably used. If your computer doesn't, you can use an HDMI to DVI adapter to convert HDMI to DVI.
connect laptop to tv

Step 2: Once a common type of port between the two devices is recognized, you will need the right connector cable to physically connect them. The different types of connector cables are pictured above. If you do not find two matching types of connection ports, you will need an adapter to make the connections type match.

Step 3: After connecting the two devices, on your TV, select the external input with which your TV is connected to the computer. It may be HDMI1 or AV1 depending on how you have made the connection. This is much similar to how you select input from your DVD player.

If you have followed the steps correctly, your TV should now be displaying your computer's screen.

Important: If your computer is not recognizing the external display, you must connect the TV before starting your computer. If the picture appears distorted, you will need to change the screen resolution of your TV by altering the display settings from your computer. Most older TVs will support only one display resolution while newer TVs will support plenty of them.

Sculptris Alpha 6


Sculptris is quite an easy to use tool designed to help you make 3D models.


OS Requirement Windows XP, Windows 2003, Windows Vista, Windows 7
License Freeware File Size 19.2 MB
Version 6
Date Added Wed 10, 2013 at 03:18 pm

                 http://download.pixologic01.com/Sculptris/Sculptris-Alpha6-Windows.zip

grape3D 0.03


grape3D is a handy, easy to use 3D scanner GUI application. The software reconstructs a 3D model with corresponding texture from a 2D movie file.


OS Requirement Windows XP, Windows 2003, Windows Vista, Windows 7
License Freeware File Size 8.03 MB
Version 0.03
Date Added Wed 10, 2013 at 03:20 pm


                   http://sourceforge.net/projects/scandraid/files/latest/download

SketchUp


Google SketchUp is a tool designed to teach you 3D modeling, whether you are a novice or experienced user.


OS Requirement Windows XP, Windows 2003, Windows Vista, Windows 7
License Freeware File Size 34.1 MB
Version 8.0.16846
Date Added Wed 10, 2013 at 03:12 pm

                      http://dl.trimble.com/sketchup/SketchUpWEN.exe