4/23/2014

Change Processor Name Permanently

A while ago on Tweak And Trick, I published an article on changing your processor name. But recently, Anil Kumar pointed out that the trick only changed the name temporarily.

After a user restarts his computer, the name reverted back to original which is obvious as each time Windows boots, it checks the connected hardware and updates the registry value automatically. So, changing the processor name using the earlier article did not had permanent effect on the processor name.

Thus, the alien processor name you had earlier again reverted back to the boring old one.


Change Processor Name Permanently

Problem: To, make the name change permanent, it was required that the user updates the Processor Name String registry key each time when Windows starts.

Solution: It is very easy to change your processor name permanently by creating a registry key and placing a shortcut to it in the windows start up folder. To do so, just follow the steps given below:-


Steps :-
1.  Open Notepad.
2.  Copy and paste the exact code given below:-

Windows Registry Editor Version 5.00

[HKEY_LOCAL_MACHINE\HARDWARE\DESCRIPTION\System\CentralProcessor\0]
"ProcessorNameString"="My Processor name 50000MHz"
To change the processor name, edit the part of the code given in blue. Also understand that \0 in the above code should only be present if Windows store your processor name at that location. Please open Registry Editor and navigate to the above mentioned keys to check whether or not to include the \0.

3.  Click on File Menu, click on Save As and select "All Types" in Save as Type option. Save the file as ProcessorNameChange.reg or *.reg.
4.  Create a new shortcut on your desktop. Enter regedit / S "Location of the .reg file" as the location of the item. For example, enter regedit /S "C:\Processor Name.reg" if your registry file is located in the root of C:\ drive.
Processor Name

5.   Copy the created Shortcut file.
6.  Navigate to C:\Documents and Settings\All Users\Start Menu\Programs\Startup (in Windows XP) or to C:\Users\ User-Name\AppData\Roaming\Microsoft\Windows\Start Menu\Programs\Startup (in Windows 8, Windows 7 and Windows Vista. Also remember that AppData is a hidden folder.)  if C: is your System drive.
7.  Paste the copied file.


This registry file would now execute each time when Windows starts and the Processor Name String would be modified each time. So, even upon restarting your computer, you will see that the changed processor name is permanent.

Why Facebook is Blue in Color?

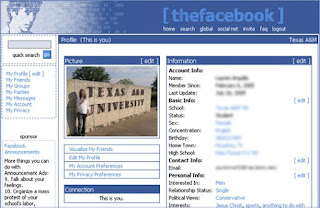
When you open Facebook, the first thing that you notice is the blue color it uses. Ever wondered why is Facebook so blue in color and not changing its color scheme?

Ever since they started as 'thefacebook', Facebook has stayed with the blue color. Although major changes have been made in the Facebook theme since then, the major unchanged thing has been the blue color.


facebook blue color
Facebook from its early days when it was known as  thefacebook

An exciting fact: In its earlier days, thefacebook.com required you to have an  .edu email id to join.

Everywhere from its login page to Facebook groups, you find only blue.

facebook is blue
Facebook Login Page. All Blue!

The reason for this is that  Mark Zuckerberg, the young founder of Facebook is red-green color-blind and blue is the richest colour for him which he confirmed in an online interview with Leo Laporte.

Another important commercial factor for using blue color is the fact that most colors tend to distract the viewers. Blue on the other hand acts as a transparent background to the main content as visible to the human brain due to which most popular websites tend to use the blue color. It can easily be called a webmaster's favorite color. Blue color is also sometimes referred to as 'Nirvana' for the brain.

All these factors make blue a prominent color on Facebook.

Corel VideoStudio Pro X6


No matter what you shoot or what you shoot it with, Corel® VideoStudio Pro X6 offers the tools you need to make videos quickly and easily. Amaze your audience with stunning Ultra HD video quality and striking visual effects.


OS Requirement Windows XP, Windows 2003, Windows Vista, Windows 7
License Shareware File Size 1.3 GB
Version X6
Date Added Thu 04, 2013 at 02:48 pm

               http://www.corel.com/corel/product/index.jsp?pid=prod4900075&cid=catalog20038&segid=8100022

Change Facebook Theme, Color & Appearance

Facebook is a social networking site which enables people to connect with friends and people around. That's how Facebook is usually introduced. However, Facebook is beyond the need of being introduced as almost everyone is on it. Despite its popularity, Facebook has one flaw; the default blue theme is really boring.

Some even consider it an annoyance while visiting Facebook. As Facebook does not allow users to change its theme like MySpace used to, users are left with no other option but to bear the theme Facebook wants them to use.

However, it is relatively easy to change the Facebook theme to a stylish one using an addon and custom themes which are available free of cost on the internet.

An example of the final outcome would be something like in the image.


Change Facebook Theme
This is the Ferrari theme. More themes are available for you to choose.


Requirement: The basic requirement for this to work is to have Mozilla Firefox or Google Chrome as your browser.

Steps to achieve this: . Mozilla Firefox users should carry out the following steps to successfully change Facebook theme.

  1. Open Mozilla Firefox and install 'Stylish' addon.
  2. Follow the basic steps to install the addon.
  3. Restart Firefox after successfully installing the Stylish addon.
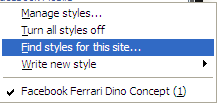
  4. Login to your Facebook Account and click on the small 'S' button in your Firefox status bar.
  5. Click on "Find Styles for this Site" to open a new tab with free themes to use for Facebook.
  6. Click on any theme and a preview will be shown.
  7. If everything is fine in the previewed theme, click on "Install with Stylish" button at the top right corner of the page.
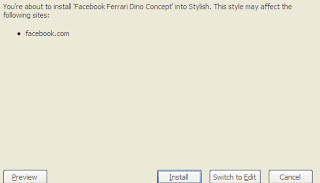
  8. A dialog box will open.
  9. Click on Install in the dialog box.

Steps for Google Chrome
  1. Install Stylish for Chrome from the Chrome Web Store.
  2. Navigate to Facebook.com and click on the S button.
  3. Click on "Find Styles for this Site" to open a new tab with free themes to use for Facebook.
  4. Click on any theme and a preview will be shown.
  5. If everything is fine in the previewed theme, click on "Install with Stylish" button at the top right corner of the page.

Stylish Button


facebook theme change

Install with stylish

Installing Ferrari theme for Stylish Firefox

Now whenever you open Facebook, it will show the theme that you have installed with Stylish instead of the boring old blue theme.

Autodesk AutoCAD 2014


Design and shape the world around you with the powerful, connected design tools in Autodesk AutoCAD software. Create stunning 3D designs, speed documentation, and connect with the cloud to collaborate on designs and access them from your mobile device.


OS Requirement Windows XP, Windows 2003, Windows Vista, Windows 7
License Shareware File Size 1.3 GB
Version 2014
Date Added Thu 04, 2013 at 02:53 pm

              http://trial2.autodesk.com/SWDLDNET3/2014/ACD/DLM/AutoCAD_2014_English_Win_32bit_dlm.sfx.exe

Show Administrator Account on Welcome Screen In Windows

Windows automatically creates an Administrator account during installation process which is by default hidden from view on the welcome screen. This article will show you a trick using which you can easily show and enable the administrator account on the welcome screen in Windows XP, Vista, 7 and 8.

Most of the time we require access to the hidden administrator account in windows to change passwords or to perform system tasks limited only to system administrators. The hidden nature causes great problem if you are using the welcome screen as you might be forced to use the classic login screen to access the account. Here is the solution to this problem.

Before going into the ins of this tweak, let me remind you that this trick requires editing the registry, so you must take utmost care not to do it wrongly and mess your computer up. If you have any doubt, you can always comment and ask before trying it out practically.


Show Administrator on Welcome Screen

So now let us begin this article. The steps to enable the administrator account are as follows:-
  1. Click on the Start.
  2. Windows XP users click on Run. Windows 7, Windows 8 and Windows Vista users type 'run' in the search bar.
  3. Type "regedit" (without quotes) in the open field and press enter.
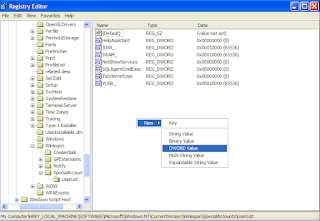
  4. Navigate to HKEY_LOCAL_MACHINE\ Software\ Microsoft\ WindowsNT\ CurrentVersion\ Winlogon\ SpecialAccounts\ Userlist .
  5. Right Click in the Work Area and create a new DWORD entry.
  6. Name it as Administrator and change its value to 1.
  7. Exit Registry Editor and Reboot/ Restart your computer to apply the changes.
To hide the administrator account on the welcome screen, change the value of Administrator DWORD to 0 in Step 6.

After using this trick , you will be able to view the administrator account on the welcome screen every time you log on.

Perfect Photo Suite 7 Premium


Create extraordinary images in less time than ever before with Perfect Photo Suite 7. The complete professional suite for every workflow. Works with Photoshop, Lightroom, Aperture, and as a standalone. 30-Day Trial


OS Requirement Windows XP, Windows 2003, Windows Vista, Windows 7
License Shareware File Size 651 MB
Version 7
Date Added Thu 04, 2013 at 03:00 pm

              http://ononesoft.cachefly.net/suite7/win/Perfect_Photo_Suite_7.1_PE.exe